23 KiB
Tutorial 2 - Extending a basic site
Overview
In the first tutorial we learned how to create a basic site using SilverStripe. This tutorial builds on what you have learned in the first tutorial, so it is recommended that you complete it first.
In this tutorial you will explore extending SilverStripe by creating your own page types. In doing this you will get a good overview of how SilverStripe works.
What are we working towards?
Throughout this tutorial we are going to work on adding two new sections to the site we built in the first tutorial. The first is a news section, with a recent news listing on the homepage and an RSS feed. The second is a staff section, which demonstrates more complex database structures by associating an image with each staff member.


The SilverStripe data model
A large part of designing complex SilverStripe sites is the creation of your own page types. Before we progress any further, it is important to understand what a page type is, and how the SilverStripe data model works.
SilverStripe is based on the "Model-View-Controller" design pattern. This means that SilverStripe attempts to separate data, logic and presentation as much as possible. Every page has three separate parts which are combined to give you the final page. Lets look at each one individually:
Model
All content on your site is stored in a database. There is a table in the database corresponding for every class that is
a child of the [api:DataObject] class. Every object of that class corresponds to a row in that table -
this is your "data object", the "model" of Model-View-Controller. A page type has a data object that represents all the data for your page - rather than inheriting
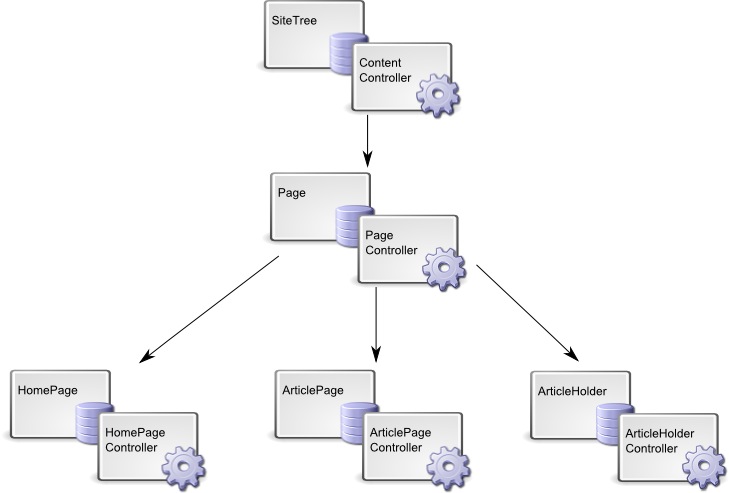
directly from data object it inherits from [api:SiteTree]. We generally create a "Page" data object, and subclass this for
the rest of the page types. This allows us to define behavior that is consistent across all pages in our site.
View
The "view" is the presentation of your site. As we have already seen, the templates SilverStripe uses to render a page is dependent on the page type. Using both your templates and css, you are able to have full control over the presentation of your site.
Controller
A page type also has a "controller". A controller contains all the code used to manipulate your data before it is
rendered. For example, suppose you were making an auction site, and you only wanted to display the auctions closing in
the next ten minutes. You would implement this in the controller. The controller for a page should inherit from
[api:ContentController]. Just as we create a "Page" data object and subclass it for the rest of the
site, we also create a "Page_Controller" that is subclassed.
Creating a new page type simply requires creating these three things. You can then have full control over presentation, the database, which fields can be edited in the CMS, and can use code to make our pages do much more clever things.
A more in-depth introduction of Model-View-Controller can be found here.
Creating the news section page types
Let's make our news section. We'll need two new page types for this. The first one is obvious: we need an ArticlePage page type. The second is a little less obvious: we need an ArticleHolder page type that contains our articles.
We'll start with the ArticlePage page type. First we create the model, a class called "ArticlePage". We put the ArticlePage class into a file called "ArticlePage.php" inside mysite/code. We also put the controller, ArticlePage_Controller, in here. Any other classes that are related to ArticlePage – for example, the class ArticlePage_AnythingElse - will also go into "ArticlePage.php".
mysite/code/ArticlePage.php
:::php
<?php
/**
 * Defines the ArticlePage page type
 */
class ArticlePage extends Page {
	static $db = array(
	);
	static $has_one = array(
	);
}

class ArticlePage_Controller extends Page_Controller {

}
Here we've created our data object/controller pair, but we haven't actually extended them at all. Don't worry about the $db and $has_one arrays just yet, we'll explain them soon, as well as other ways in which you can extend your page types. SilverStripe will use the template for the Page page type as explained in the first tutorial, so we don't need to specifically create the view for this page type.
Let's create the ArticleHolder page type.
mysite/code/ArticleHolder.php
:::php
<?php
/**
 * Defines the ArticleHolder page type
 */
class ArticleHolder extends Page {
	static $db = array(
	);
	static $has_one = array(
	);

	static $allowed_children = array('ArticlePage');
}

class ArticleHolder_Controller extends Page_Controller {

}
Here we have done something interesting: the $allowed_children field. This is one of a number of static fields we can define to change the properties of a page type. The $allowed_children field is an array of page types that are allowed to be children of the page in the site tree. As we only want news articles in the news section, we only want ArticlePage pages for children. We can enforce this in the CMS by setting the $allowed_children field.
We will be introducing other fields like this as we progress; there is a full list in the documentation for
[api:SiteTree].
Now that we have created our page types, we need to let SilverStripe rebuild the database. If we rebuild the database by going to http://localhost/dev/build?flush=1, SilverStripe will detect that there are two new page types and add them to the list of page types in the database.
It is SilverStripe convention to suffix general page types with "Page", and page types that hold other page types with "Holder". This is to ensure that we don't have URLs with the same name as a page type; if we named our ArticleHolder page type "News", it would conflict with the page name also called "News".
Adding date and author fields
Now that we have an ArticlePage page type, let's make it a little more useful. Remember the $db array? We can use this array to add extra fields to the database. It would be nice to know when each article was posted, and who posted it. Change the $db array in the ArticlePage class so it looks like this:
:::php
<?php
class ArticlePage extends Page {
	static $db = array(
		'Date' => 'Date',
		'Author' => 'Text'
	);

	// .....
}
Every entry in the array is a key-value pair. The key is the name of the field, and the value is the type. We have a
[api:Date] for a complete list of different data types.
Note: The names chosen for the fields you add must not already be used. Be careful using field names such as Title, Content etc. as these may already be defined in the page types your new page is extending from.
If we rebuild the database, we will see that now the ArticlePage table is created. Even though we had an ArticlePage page type before, the table was not created because we had no fields that were unique to the article page type. We now have the extra fields in the database, but still no way of changing them. To add these fields to the CMS we have to override the getCMSFields() method, which is called by the CMS when it creates the form to edit a page. Add the method to the ArticlePage class.
:::php
<?php
class ArticlePage extends Page {
	// ...

	public function getCMSFields() {
		$fields = parent::getCMSFields();

		$datefield = new DateField('Date');
		$datefield->setConfig('showcalendar', true);
		$fields->addFieldToTab('Root.Main', $datefield, 'Content');
		$fields->addFieldToTab('Root.Main', new TextField('Author'), 'Content');

		return $fields;
	}
}

// ...
Let's walk through this method.
:::php
$fields = parent::getCMSFields();
Firstly, we get the fields from the parent class; we want to add fields, not replace them. The $fields variable
returned is a [api:FieldList] object.
:::php
$fields->addFieldToTab('Root.Main', new TextField('Author'), 'Content');
$fields->addFieldToTab('Root.Main', new DateField('Date'), 'Content');
We can then add our new fields with addFieldToTab. The first argument is the tab on which we want to add the field to:
"Root.Main" is the tab which the content editor is on (another is "Root.Metadata". The second argument is the field to add; this is not a database field, but a [api:FormField] - see the documentation for more details.
We add two fields: A simple [api:TextField} and a [api:DateField]. There are many more FormFields available in the default installation, please refer to Form Field Types for the list.
:::php
return $fields;
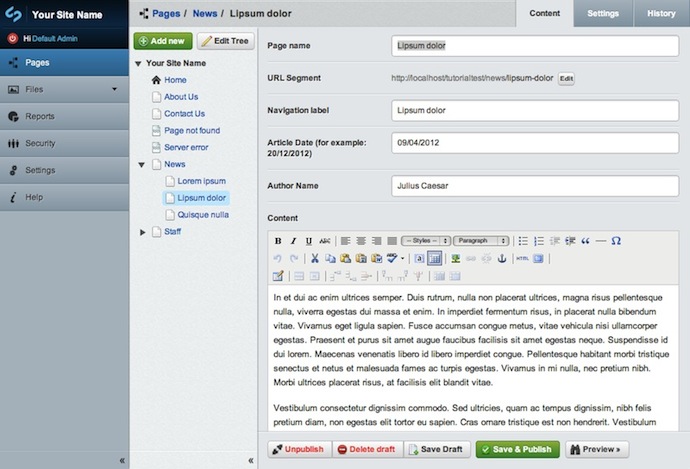
Finally, we return the fields to the CMS. If we flush the cache (by adding ?flush=1 at the end of the URL), we will be able to edit the fields in the CMS.
Now that we have created our page types, let's add some content. Go into the CMS and create an ArticleHolder page named "News", and create some ArticlePages inside it.
Modifing the date field
At the moment, your date field will look just like a text field. This makes it confusing and doesn't give the user much help when adding a date.
To make the date field a bit more user friendly, you can add a dropdown calendar, set the date format and add better title. By default, the date field will have the date format defined by your locale.
:::php
<?php

class ArticlePage extends Page {

// .....

public function getCMSFields() {
	$fields = parent::getCMSFields();

	$fields->addFieldToTab('Root.Main', $dateField = new DateField('Date','Article Date (for example: 20/12/2010)'), 'Content');
	$dateField->setConfig('showcalendar', true);
	$dateField->setConfig('dateformat', 'dd/MM/YYYY');

	$fields->addFieldToTab('Root.Main', new TextField('Author','Author Name'), 'Content');

	return $fields;
}
Let's walk through these changes.
:::php
$fields->addFieldToTab('Root.Content', $dateField = new DateField('Date','Article Date (for example: 20/12/2010)'), 'Content');
$dateField is declared only to in order to change the configuration of the DateField.
:::php
$dateField->setConfig('showcalendar', true);
Set showCalendar to true to have a calendar appear underneath the Date field when you click on the field.
:::php
$dateField->setConfig('dateformat', 'dd/MM/YYYY');
dateFormat allows you to specify how you wish the date to be entered and displayed in the CMS field.
:::php
$fields->addFieldToTab('Root.Content', new TextField('Author','Author Name'), 'Content');
By default the field name 'Date' or 'Author' is shown as the title, however this might not be that helpful so to change the title,
add the new title as the second argument. See the [api:DateField] documentation for more details of the DateField configuration.
Creating the templates
We can already look at the content of news pages on our site, because the article holder page and the article pages inherit their templates from Page. But we're not getting the author and date fields displayed in either case.
So let's create a template for each of our new page types. We'll put these in themes/tutorial/templates/Layout so we only have to define the page specific parts: SilverStripe will use themes/tutorial/templates/Page.ss for the basic page layout.
First, the template for displaying a single article:
themes/simple/templates/Layout/ArticlePage.ss
:::ss
<div class="content-container">
<article>
<h1>$Title</h1>
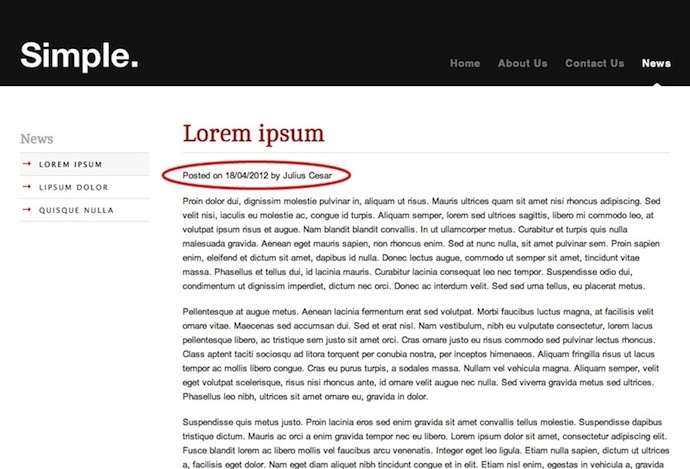
<div class="news-details">
<p>Posted on $Date.Nice by $Author</p>
</div>
<div class="content">$Content</div>
</article>
$Form
$PageComments
</div>
<% include SideBar %>
Most of the code is just like the regular Page.ss, we include an informational div with the date and the author of the Article.
We use $Date and $Author to access the new fields. In fact, all template variables and page controls come from
either the data object or the controller for the page being displayed. The $Title variable comes from the
Title field of the [api:SiteTree] class. $Date and $Author come from the ArticlePage table through
your custom Page. $Content comes from the SiteTree table through the same data object. The data for your page is
spread across several tables in the database matched by id - e.g. Content is in the SiteTree table, and Date and
Author are in the ArticlePage table. SilverStripe matches these records by their ids and collates them into the single
data object.

Rather than using $Date directly, we use $Date.Nice. If we look in the [api:Date] documentation, we can see
that the Nice function returns the date in dd/mm/yyyy format, rather than the yyyy-mm-dd format stored in the
database.
Now we'll create a template for the article holder: we want our news section to show a list of news items, each with a summary.
themes/simple/templates/Layout/ArticleHolder.ss
:::ss
<div class="content-container">
<article>
<h1>$Title</h1>
$Content
<div class="content">$Content</div>
</article>
<% loop Children %>
<article>
<h2><a href="$Link" title="Read more on "{$Title}"">$Title</a></h2>
<p>$Content.FirstParagraph</p>
<a href="$Link" title="Read more on "{$Title}"">Read more >></a>
</article>
<% end_loop %>
$Form
</div>
<% include SideBar %>
Here we use the page control Children. As the name suggests, this control allows you to iterate over the children of a
page, which in this case is our news articles. The $Link variable will give the address of the article which we can
use to create a link, and the FirstParagraph function of the [api:HTMLText] field gives us a nice summary of the
article. The function strips all tags from the paragraph extracted.

Using include files in templates
You can make your templates more modular and easier to maintain by separating commonly-used pieces into include files.
You are already familiar with the <% include Sidebar %>-Line for the menu.
We'll separate the display of linked articles as we want to reuse this code later on.
Replace the code in ArticleHolder.ss* with an include statement:
themes/simple/templates/Layout/ArticleHolder.ss
:::ss
...
<% loop Children %>
	<% include ArticleTeaser %>
<% end_loop %>
...
and paste the code in a new include snippet:
themes/simple/templates/Includes/ArticleTeaser.ss
:::ss
<article>
<h2><a href="$Link" title="Read more on "{$Title}"">$Title</a></h2>
<p>$Content.FirstParagraph</p>
<a href="$Link" title="Read more on "{$Title}"">Read more >></a>
</article>
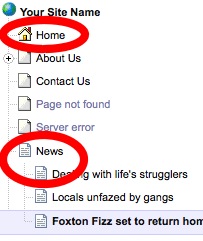
Changing the icons of pages in the CMS
Let's now make a purely cosmetic change that nevertheless helps to make the information presented in the CMS clearer. Add the following field to the ArticleHolder and ArticlePage classes:
:::php
static $icon = "framework/docs/en/tutorials/_images/treeicons/news-file.gif";
And this one to the HomePage class:
:::php
static $icon = "framework/docs/en/tutorials/_images/treeicons/home-file.gif";
This will change the icons for the pages in the CMS.
Showing the latest news on the homepage
It would be nice to greet page visitors with a summary of the latest news when they visit the homepage. This requires a little more code though - the news articles are not direct children of the homepage, so we can't use the Children control. We can get the data for the news articles by implementing our own function in HomePage_Controller.
mysite/code/HomePage.php
:::php
...
public function LatestNews($num=5) {
	$holder = DataObject::get_one("ArticleHolder");
	return ($holder) ? DataList::create('ArticlePage')->where('"ParentID" = '.$holder->ID)->sort('Date DESC')->limit($num) : false;
}
...
This function simply runs a database query that gets the latest news articles from the database. By default, this is five, but you can change it by passing a number to the function. See the Data Model documentation for details. We can reference this function as a page control in our HomePage template:
themes/tutorial/templates/Layout/Homepage.ss
:::ss
...
<div class="content">$Content</div>
</article>
<% loop LatestNews %>
	<% include ArticleTeaser %>
<% end_loop %>
...
When SilverStripe comes across a variable or page control it doesn't recognize, it first passes control to the controller. If the controller doesn't have a function for the variable or page control, it then passes control to the data object. If it has no matching functions, it then searches its database fields. Failing that it will return nothing.
The controller for a page is only created when page is actually visited, while the data object is available when the page is referenced in other pages, e.g. by page controls. A good rule of thumb is to put all functions specific to the page currently being viewed in the controller; only if a function needs to be used in another page should you put it in the data object.

Creating a RSS feed
An RSS feed is something that no news section should be without. SilverStripe makes it easy to create RSS feeds by
providing an [api:RSSFeed] class to do all the hard work for you. Create the following function in the
ArticleHolder_Controller:
:::php
public function rss() {
	$rss = new RSSFeed($this->Children(), $this->Link(), "The coolest news around");
	$rss->outputToBrowser();
}
This function simply creates an RSS feed of all the news articles, and outputs it to the browser. If you go to http://localhost/news/rss you will see our RSS feed. What happens here is that when there is more to a URL after the page's base URL - "rss" in this case - SilverStripe will call the function with that name on the controller if it exists.
Depending on your browser, you should see something like the picture below. If your browser doesn't support RSS, you will most likely see the XML output instead.

Now all we need is to let the user know that our RSS feed exists. The [api:RSSFeed] in your controller, it will be
called when the page is requested. Add this function to ArticleHolder_Controller:
:::php
public function init() {
	RSSFeed::linkToFeed($this->Link() . "rss");
	parent::init();
}
This automatically generates a link-tag in the header of our template. The init function is then called on the parent class to ensure any initialization the parent would have done if we hadn't overridden the init function is still called. Depending on your browser, you can see the RSS feed link in the address bar:

Adding a staff section
Now that we have a complete news section, let's move on to the staff section. We need to create StaffHolder and StaffPage page types, for an overview on all staff members and a detail-view for a single member. First let's start with the StaffHolder page type.
mysite/code/StaffHolder.php
:::php
<?php

class StaffHolder extends Page {
	static $db = array(
	);
	static $has_one = array(
	);

	static $allowed_children = array('StaffPage');
}

class StaffHolder_Controller extends Page_Controller {

}
Nothing here should be new. The StaffPage page type is more interesting though. Each staff member has a portrait image. We want to make a permanent connection between this image and the specific StaffPage (otherwise we could simply insert an image in the $Content field).
mysite/code/StaffPage.php
:::php
<?php
class StaffPage extends Page {
static $db = array(
);
static $has_one = array(
'Photo' => 'Image'
);
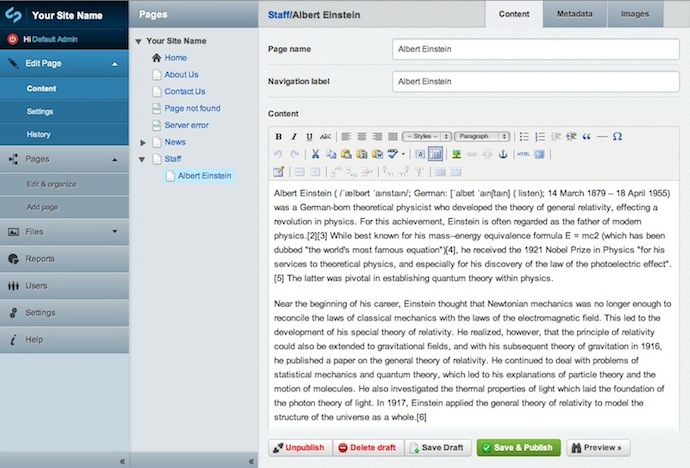
public function getCMSFields() {
$fields = parent::getCMSFields();
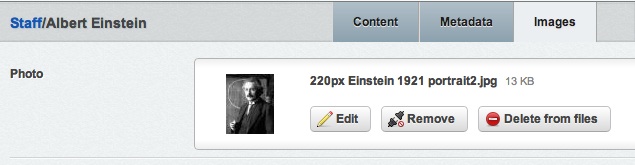
$fields->addFieldToTab("Root.Images", new UploadField('Photo'));
return $fields;
}
}
class StaffPage_Controller extends Page_Controller {
}
Instead of adding our Image as a field in $db, we have used the $has_one array. This is because an Image is not a simple database field like all the fields we have seen so far, but has its own database table. By using the $has_one array, we create a relationship between the StaffPage table and the Image table by storing the id of the respective Image in the StaffPage table.
We then add an [api:UploadField] in the getCMSFields function to the tab "Root.Images". Since this tab doesn't exist,
the addFieldToTab function will create it for us. The UploadField allows us to select an image or upload a new one in
the CMS.
Rebuild the database (http://localhost/dev/build?flush=1) and open the CMS. Create a new StaffHolder called "Staff", and create some StaffPages in it.
Creating the staff section templates
The staff section templates aren't too difficult to create, thanks to the utility methods provided by the [api:Image] class.
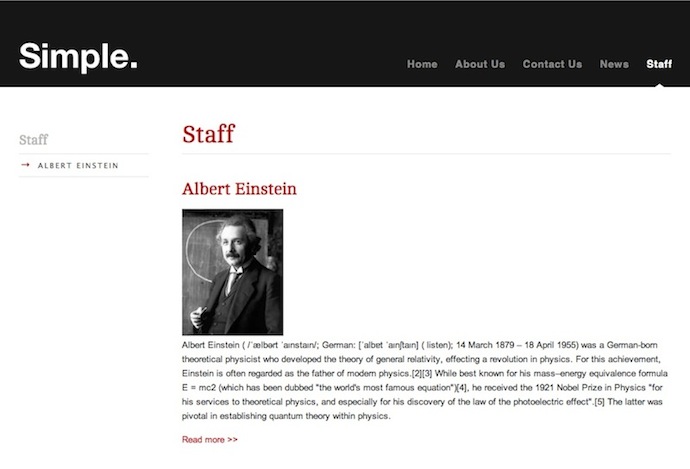
themes/simple/templates/Layout/StaffHolder.ss
:::ss
<div class="content-container">
<article>
<h1>$Title</h1>
$Content
<div class="content">$Content</div>
</article>
<% loop Children %>
<article>
<h2><a href="$Link" title="Read more on "{$Title}"">$Title</a></h2>
$Photo.SetWidth(150)
<p>$Content.FirstParagraph</p>
<a href="$Link" title="Read more on "{$Title}"">Read more >></a>
</article>
<% end_loop %>
$Form
</div>
<% include SideBar %>
This template is very similar to the ArticleHolder template. The SetWidth method of the [api:Image] class
will resize the image before sending it to the browser. The resized image is cached, so the server doesn't have to
resize the image every time the page is viewed.
The StaffPage template is also very straight forward.
themes/tutorial/templates/Layout/StaffPage.ss
:::ss
<div class="content-container">
	<article>
		<h1>$Title</h1>
		<div class="content">
			$Photo.SetWidth(433)
			$Content</div>
	</article>
		$Form
		$PageComments
</div>
<% include SideBar %>
Here we also use the SetWidth function to get a different sized image from the same source image. You should now have a complete staff section.
Summary
In this tutorial we have explored the concept of page types. In the process of creating and extending page types you have been introduced to many of the concepts required to build a site with SilverStripe.