23 KiB
Tutorial 5 - Dataobject Relationship Management
Overview
In the second tutorial we have learned how to add extrafields to a page type thanks to the $db array and how to add an image using the $has_one array and so create a relationship between a table and the Image table by storing the id of the respective Image in the first table. This tutorial explores all this relations between DataObjects and the way to manage them easily.
What are we working towards?
To simulate these relations between objects, we are going to simulate the management via the CMS of the Google Summer Of Code 2007 that SilverStripe was part of.
To do this, we are gonna use the following objects :
- Project : Project on SilverStripe system for the GSOC
- Student : Student involved in the project
- Mentor : SilverStripe developer
- Module : Module used for the project
This is a table which sums up the relations between them :
| Project | Student | Mentor | Modules |
|---|---|---|---|
| i18n Multi-Language | Bernat Foj Capell | Ingo Schommer | Cms, Framework, i18n, Translation |
| Image Manipulation | Mateusz Ujma | Sam Minnee | Cms, Framework, ImageManipulation |
| Google Maps | Ofir Picazo Navarro | Hayden Smith | Cms, Framework, Maps |
| Mashups | Lakshan Perera | Matt Peel | Cms, Framework, MashUps |
| Multiple Databases | Philipp Krenn | Brian Calhoun | Cms, Framework, MultipleDatabases |
| Reporting | Quin Hoxie | Sam Minnee | Cms, Framework, Reporting |
| Security & OpenID | Markus Lanthaler | Hayden Smith | Cms, Framework, auth_openid |
| SEO | Will Scott | Brian Calhoun | Cms, Framework, googleadwords, googleanalytics |
| Usability | Elijah Lofgren | Sean Harvey | Cms, Framework, UsabilityElijah |
| Safari 3 Support | Meg Risen | Sean Harvey | Cms, Framework, UsabilityMeg |
GSOC Projects
Before starting the relations management, we need to create a ProjectsHolder class where we will save the GSOC Project pages.
tutorial/code/ProjectsHolder.php
:::php
<?php

class ProjectsHolder extends Page {

	static $allowed_children = array( 'Project' );

}

class ProjectsHolder_Controller extends Page_Controller {

}
Project - Student relation
A project can only be done by one student.
A student has only one project.
This relation is called a 1-to-1 relation.
The first step is to create the student and project objects.
tutorial/code/Student.php
:::php
<?php

class Student extends DataObject {

	static $db = array(
		'FirstName' => 'Text',
		'Lastname' => 'Text',
		'Nationality' => 'Text'
	);

	public function getCMSFields_forPopup() {
		$fields = new FieldList();

		$fields->push( new TextField( 'FirstName', 'First Name' ) );
		$fields->push( new TextField( 'Lastname' ) );
		$fields->push( new TextField( 'Nationality' ) );

		return $fields;
	}

}
tutorial/code/Project.php
:::php
<?php

class Project extends Page {

	static $has_one = array(
		'MyStudent' => 'Student'
	);

}
class Project_Controller extends Page_Controller {}
This code will create a relationship between the Project table and the Student table by storing the id of the respective Student in the Project table.
The second step is to add the table in the method getCMSFields which will allow you to manage the has_one relation.
:::php
class Project extends Page {

	...

	public function getCMSFields() {
		$fields = parent::getCMSFields();

		$tablefield = new HasOneComplexTableField(
			$this,
			'MyStudent',
			'Student',
			array(
				'FirstName' => 'First Name',
				'Lastname' => 'Family Name',
				'Nationality' => 'Nationality'
			),
			'getCMSFields_forPopup'
		);
		$tablefield->setParentClass('Project');

		$fields->addFieldToTab( 'Root.Student', $tablefield );

		return $fields;
	}

}
Let’s walk through the parameters of the HasOneComplexTableField constructor.
- $this : The first object concerned by the relation
- 'MyStudent' : The name of the second object of the relation
- 'Student' : The type of the second object of the relation
- array(...) : The fields of the second object which will be in the table
- 'getCMSFields_forPopup' : The method which will be called to add, edit or only show a second object
You can also directly replace the last parameter by this code :
:::php
   new FieldList(
      new TextField( 'FirstName', 'First Name' ),
      new TextField( 'Lastname' ),
      new TextField( 'Nationality' )
   );
Now that we have created our Project page type and Student data object, let’s add some content.
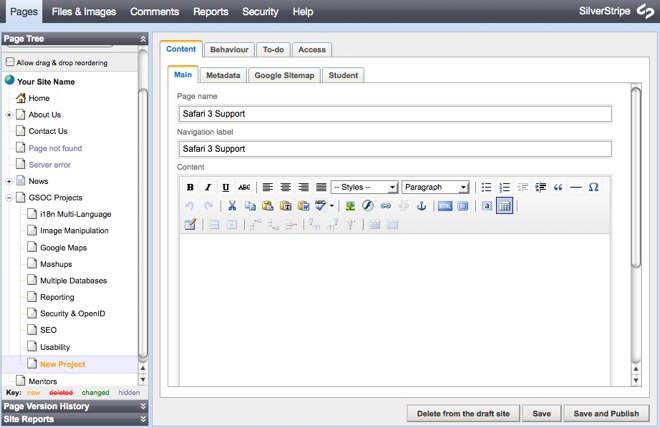
Go into the CMS and create one Project page for each project listed above under a ProjectsHolder page named GSOC Projects for instance.
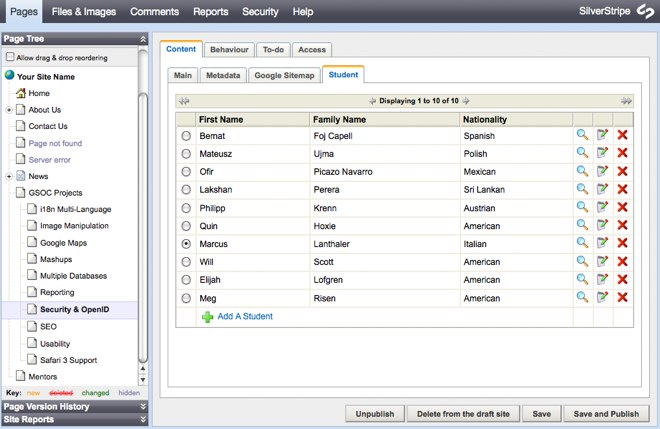
As you can see in the tab panel Student, the adding functionality is titled Add Student. However, if you want to modify this title, you have to add this code in the getCMSFields method of the Project class :
:::php
$tablefield->setAddTitle( 'A Student' );
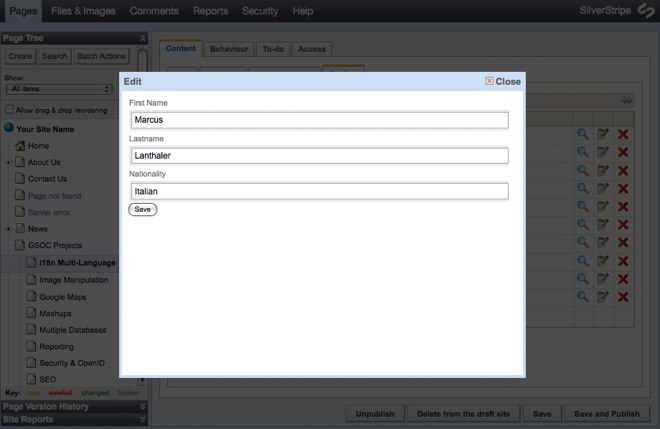
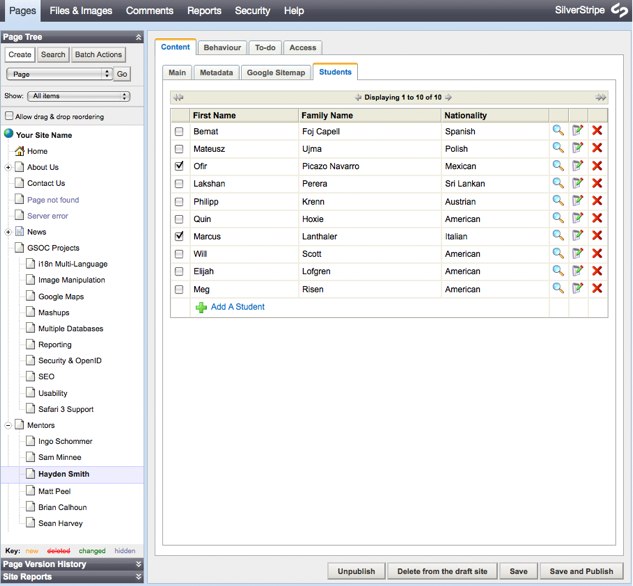
Select now one of the Project page that you have created, go in the tab panel Student and add all the students listed above by clicking on the link Add A Student of your HasOneComplexTableField table.
After having added all the students, you will see that, in the tab panel Student of all the Project pages, the HasOneComplexTableField tables have the same content.
For each Project page, you can now affect one and only one student to it ( see the list ).
You will also notice, that you have the possibility to unselect a student which will make your Project page without any student affected to it.
At the moment, the HasOneComplexTableField table doesn't manage totally the 1-to-1 relation because you can easily select the same student for two ( or more ) differents Project pages which corresponds to a 1-to-many relation.
To use your HasOneComplexTableField table for a 1-to-1 relation, make this modification in the class Project :
:::php
class Project extends Page {

	...

	public function getCMSFields() {

		...

		$tablefield->setParentClass('Project');

		$tablefield->setOneToOne();

		$fields->addFieldToTab( 'Root.Content.Student', $tablefield );

		return $fields;
	}

}
Now, you will notice that by checking a student in a Project page, you will be unable to select him again in any other Project page which is the definition of a 1-to-1 relation.
Student - Mentor relation
A student has one mentor.
A mentor has several students.
This relation is called a 1-to-many relation.
The first step is to create the mentor object and set the relation with the Student data object.
tutorial/code/Mentor.php
:::php
<?php

class Mentor extends Page {

	static $db = array(
		'FirstName' => 'Text',
		'Lastname' => 'Text',
		'Nationality' => 'Text'
	);

	static $has_many = array(
		'Students' => 'Student'
	);

	public function getCMSFields() {
		$fields = parent::getCMSFields();

		$fields->addFieldToTab( 'Root.Content', new TextField( 'FirstName' ) );
		$fields->addFieldToTab( 'Root.Content', new TextField( 'Lastname' ) );
		$fields->addFieldToTab( 'Root.Content', new TextField( 'Nationality' ) );

		return $fields;
	}

}
class Mentor_Controller extends Page_Controller {}
tutorial/code/Student.php
:::php
class Student extends DataObject {

	...

	static $has_one = array(
		'MyMentor' => 'Mentor'
	);

}
This code will create a relationship between the Student table and the Mentor table by storing the id of the respective Mentor in the Student table.
The second step is to add the table in the method getCMSFields which will allow you to manage the has_many relation.
tutorial/code/Mentor.php
:::php
class Mentor extends Page {

	...

	public function getCMSFields() {
		$fields = parent::getCMSFields();

		...

		$tablefield = new HasManyComplexTableField(
			$this,
			'Students',
			'Student',
			array(
				'FirstName' => 'FirstName',
				'Lastname' => 'Family Name',
				'Nationality' => 'Nationality'
			),
			'getCMSFields_forPopup'
		);
		$tablefield->setAddTitle( 'A Student' );

		$fields->addFieldToTab( 'Root.Students', $tablefield );

		return $fields;
	}

}
class Mentor_Controller extends Page_Controller {}
To know more about the parameters of the HasManyComplexTableField constructor, check those of the HasOneComplexTableField constructor.
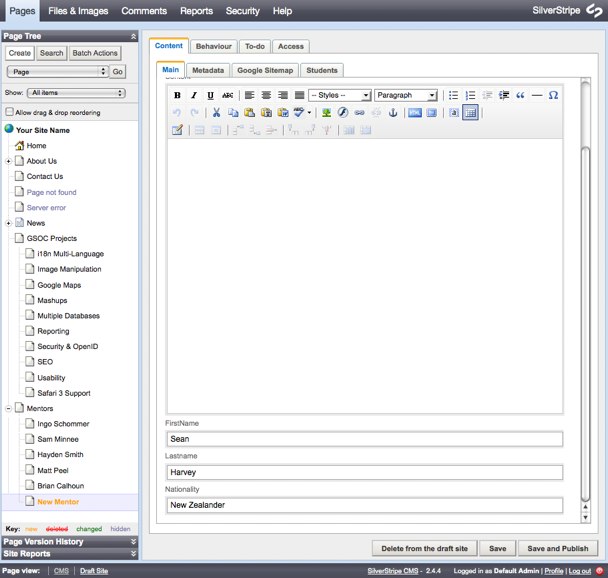
Now that we have created our Mentor page type, go into the CMS and create one Mentor page for each mentor listed above under a simple Page named Mentors for instance.
For each Mentor page, you can now affect many students created previously ( see the list ) by going in the tab panel Students.
You will also notice, that by checking a student in a Mentor page, you will be unable to select him again in any other Mentor page which is the definition of a 1-to-many relation.
As the HasOneComplexTableField table, you also have the possibility not to select any student which will make your Mentor page without any student affected to it.
Project - Module relation
A project uses several modules.
A module is used by several projects.
This relation is called a many-to-many relation.
The first step is to create the module object and set the relation with the Project page type.
tutorial/code/Module.php
:::php
<?php

class Module extends DataObject {

   static $db = array(
      'Name' => 'Text'
   );

   static $belongs_many_many = array(
      'Projects' => 'Project'
   );

   public function getCMSFields_forPopup() {
      $fields = new FieldList();
      $fields->push( new TextField( 'Name' ) );
      return $fields;
   }

}
tutorial/code/Project.php
:::php
class Project extends Page {

   ...

   static $many_many = array(
      'Modules' => 'Module'
   );

}
This code will create a relationship between the Project table and the Module table by storing the ids of the respective Project and Module in a another table named Project_Modules.
The second step is to add the table in the method getCMSFields which will allow you to manage the many_many relation.
:::php
class Project extends Page {

   ...

   public function getCMSFields() {
      $fields = parent::getCMSFields();

      ...

      $modulesTablefield = new ManyManyComplexTableField(
         $this,
         'Modules',
         'Module',
         array(
	    'Name' => 'Name'
         ),
         'getCMSFields_forPopup'
      );
      $modulesTablefield->setAddTitle( 'A Module' );

      $fields->addFieldToTab( 'Root.Modules', $modulesTablefield );

      return $fields;
   }

}
To know more about the parameters of the ManyManyComplexTableField constructor, check those of the HasOneComplexTableField constructor.
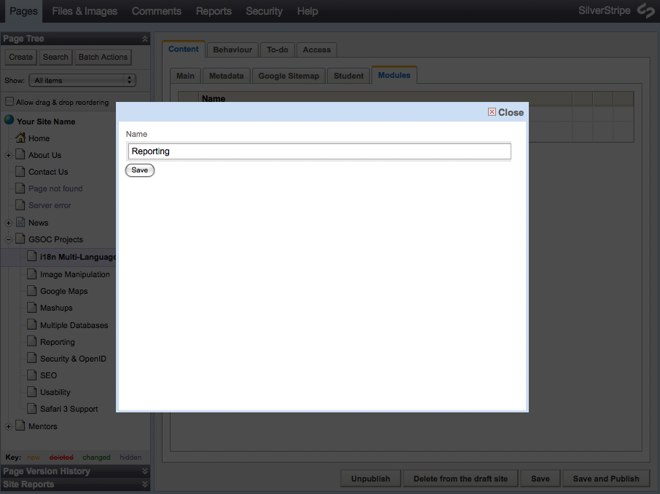
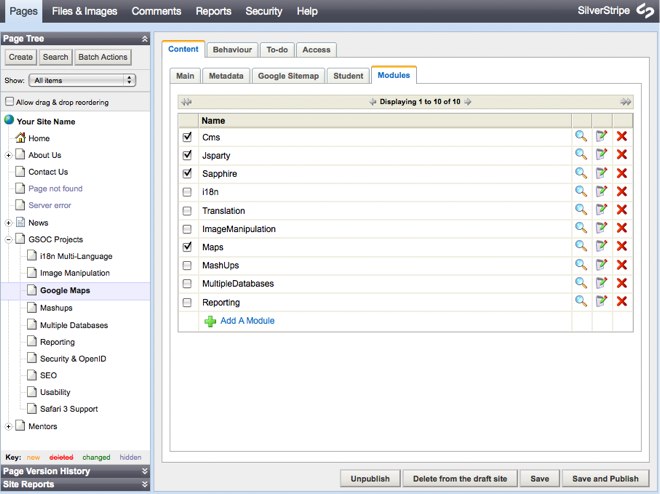
Select now one of the Project page, go in the tab panel Modules and add all the modules listed above by clicking on the link Add A Module of your ManyManyComplexTableField table.
For each Project page, you can now affect many modules created previously ( see the list ) by going in the tab panel Modules.
You will also notice, that you are able to select several times a Module on different Project pages which is the definition of a many-to-many relation.
As the HasOneComplexTableField and HasManyComplexTableField table, you also have the possibility not to select any module which will make your Project page without any module affected to it.
Displaying the data on your website
Now that we have created all the Page and DataObject classes necessary and the relational tables to manage the relations between them, we would like to see these relations on the website.
We will see in this section how to display all these relations but also how to create a template for a DataObject.
For every kind of Page or DataObject, you can access to their relations thanks to the control loop.
1. GSOC Projects
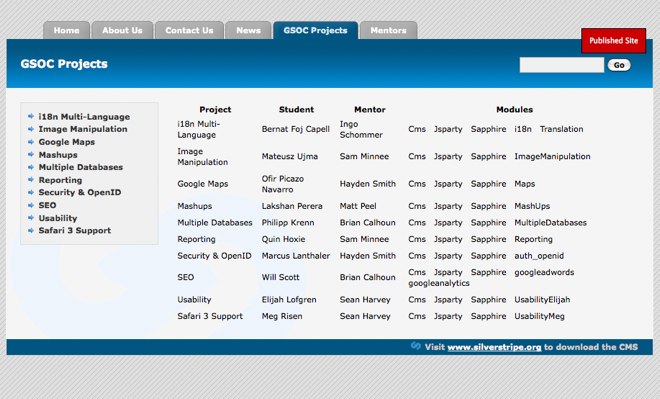
Let's start with the ProjectsHolder page created before. For this template, we are will display the same table than above.
tutorial/templates/Layout/ProjectsHolder.ss
:::ss
<% include Menu2 %>
<div id="Content" class="typography">
<% if Level(2) %>
<% include BreadCrumbs %>
<% end_if %>
$Content
<table>
<thead>
<tr>
<th>Project</th>
<th>Student</th>
<th>Mentor</th>
<th>Modules</th>
</tr>
</thead>
<tbody>
<% loop Children %>
<tr>
<td>$Title</td>
<td>
<% if MyStudent %>
<% loop MyStudent %>
$FirstName $Lastname
<% end_loop %>
<% else %>
No Student
<% end_if %>
</td>
<td>
<% if MyStudent %>
<% loop MyStudent %>
<% if MyMentor %>
<% loop MyMentor %>
$FirstName $Lastname
<% end_loop %>
<% else %>
No Mentor
<% end_if %>
<% end_loop %>
<% else %>
No Mentor
<% end_if %>
</td>
<td>
<% if Modules %>
<% loop Modules %>
$Name
<% end_loop %>
<% else %>
No Modules
<% end_if %>
</td>
</tr>
<% end_loop %>
</tbody>
</table>
$Form
</div>
2. Project
We know now how to easily access and show relations between DataObject in a template.
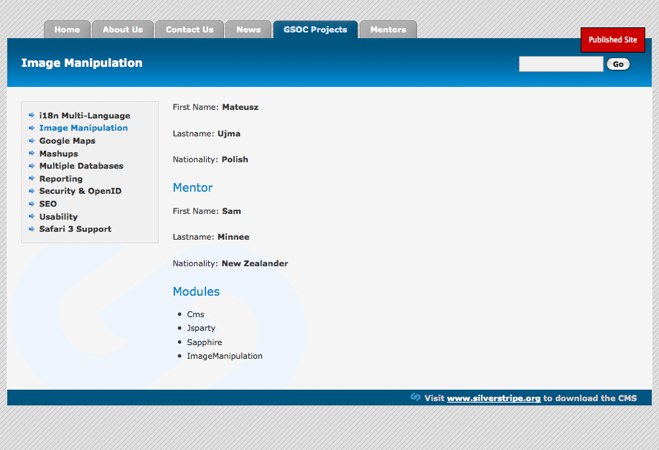
We can now do the same for every Project page by creating its own template.
tutorial/templates/Layout/Project.ss
:::ss
<% include Menu2 %>

<div id="Content" class="typography">
	<% if Level(2) %>
        <% include BreadCrumbs %>
    <% end_if %>

	$Content

	<% if MyStudent %>
        <% loop MyStudent %>
            <p>First Name: <strong>$FirstName</strong></p>
            <p>Lastname: <strong>$Lastname</strong></p>
            <p>Nationality: <strong>$Nationality</strong></p>

            <h3>Mentor</h3>

            <% if MyMentor %>
                <% loop MyMentor %>
                    <p>First Name: <strong>$FirstName</strong></p>
                    <p>Lastname: <strong>$Lastname</strong></p>
                    <p>Nationality: <strong>$Nationality</strong></p>
                <% end_loop %>
            <% else %>
                <p>This student doesn't have any mentor.</p>
            <% end_if %>
        <% end_loop %>
    <% else %>
        <p>There is no any student working on this project.</p>
    <% end_if %>

    <h3>Modules</h3>

    <% if Modules %>
        <ul>
            <% loop Modules %>
                <li>$Name</li>
            <% end_loop %>
        </ul>
    <% else %>
        <p>This project has not used any modules.</p>
    <% end_if %>

	$Form

</div>
What we would like now is to create a special template for the DataObject Student and the Page Mentor which will be used when we will call directly the variable in the Project template. In our case, we will use the same template because these two classes have the same fields ( FirstName, Surname and Nationality ).
tutorial/templates/Includes/GSOCPerson.ss
:::ss
<p>First Name: <strong>$FirstName</strong></p>
<p>Lastname: <strong>$Lastname</strong></p>
<p>Nationality: <strong>$Nationality</strong></p>
Now the template is created, we need to establish the link between the Student and Mentor classes with their common template.
To do so, add this code in the two classes. This will create a control on each of those objects which can be called from templates either within a control block or dot notation.
tutorial/code/Student.php, tutorial/code/Mentor.php
:::php
public function PersonalInfo() {
	$template = 'GSOCPerson';
	return $this->renderWith( $template );
}
We can now modify the Project.ss template.
:::ss

...

<% if MyStudent %>
	$MyStudent.PersonalInfo

	<h3>Mentor</h3>

	<% loop MyStudent %>
		<% if MyMentor %>
			$MyMentor.PersonalInfo
		<% else %>
			<p>This student doesn't have any mentor.</p>
		<% end_if %>
	<% end_loop %>
<% else %>
	<p>There is no any student working on this project.</p>
<% end_if %>

...
In the Project template, it has been really easy to display the 1-to-1 relation with a Student object just by calling the variable $MyStudent. This has been made possible thanks to the code below present in the Project class.
:::php
static $has_one = array(
    'MyStudent' => 'Student'
);
However, in the Student class, there is no any code relating to the 1-to-1 relation with a Project Page. So how to access it from a Student DataObject ?
3. Mentor
In this template, we are gonna try to access the Project details from a Student DataObject.
What we want to do is to access to the Project page in the same way than we have done for the other relations without modifying the relations between Page and DataObject and the database structure.
To do so, we have to create a function in the Student class which will return the Project linked with it. Let's call it MyProject for instance.
:::php
class Student extends DataObject {

	...

	public function MyProject() {
		return Project::get()->filter("MyStudentID", $this->ID);
	}

}
We can now use this value in the same way that we have used the other relations. That's how we can use this function in the Mentor template.
tutorial/templates/Layout/Mentor.ss
:::ss
<% include Menu2 %>

<div id="Content" class="typography">
	<% include BreadCrumbs %>
	$Content

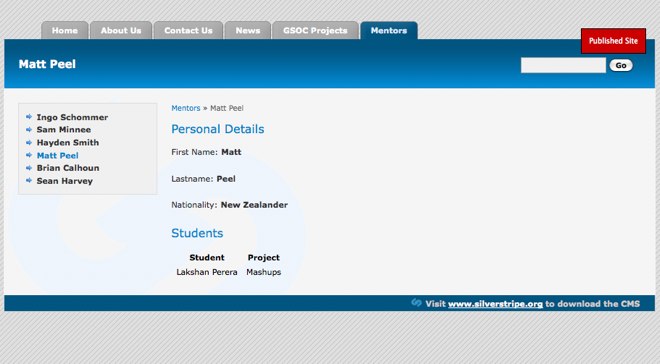
    <h3>Personal Details</h3>

    <p>First Name: <strong>$FirstName</strong></p>
    <p>Lastname: <strong>$Lastname</strong></p>
    <p>Nationality: <strong>$Nationality</strong></p>

    <h3>Students</h3>

    <% if Students %>
        <table>
            <thead>
                <tr>
                    <th>Student</th>
                    <th>Project</th>
                </tr>
            </thead>
            <tbody>
                <% loop Students %>
                    <tr>
                        <td>$FirstName $Lastname</td>
                        <td>
                            <% if MyProject %>
                                <% loop MyProject %>
                                    $Title
                                <% end_loop %>
                            <% else %>
                                No Project
                            <% end_if %>
                        </td>
                    </tr>
                <% end_loop %>
            </tbody>
        </table>
    <% else %>
        <p>There is no any student working with this mentor.</p>
    <% end_if %>

    $Form
</div>
Summary
This tutorial has demonstrated how easy it is to manage all the type of relations between DataObject objects in the CMS and how to display them on the website.
Download the code
Download all the code for this tutorial.
You can also download the code for use in the blackcandy template.
