21 KiB
Tutorial 1 - Building a Basic Site
Overview
Welcome to the first in this series of tutorials on the SilverStripe Content Management System (CMS).
These tutorials are designed to take you from an absolute beginner to being able to build large, complex websites with SilverStripe. We assume to begin with, that you have some XHTML, CSS and PHP knowledge. This first tutorial provides an absolute introduction to building a simple website using SilverStripe. It will also teach you how to use the content management system at a basic level.
What are we working towards?
We are going to create a site in which all the content can be edited in the SilverStripe CMS. It will have a two-level navigation system, which will be generated on the fly to include all pages you add in the CMS. We will use two different templates - one for the home page, and one for the rest of the site.
Installation
You need to download the SilverStripe software and install it to your local machine or to a webserver.
For more infomation about installing and configuring a webserver read the Installation instructions and videos.
This tutorial uses the SilverStripe CMS default theme 'Simple' which you will find in the themes folder. We will investigate the existing template files that make up the theme as well as create some new files to build upon the theme.
Exploring the installation
After installation, open up the folder where you installed SilverStripe.
If you installed on windows with WAMP, it will likely be at c:\wamp\wwww. On Mac OS X, using the built in webserver, it will be in your sites directory /Sites/ (with MAMP, it will likely be at /Applications/MAMP/htdocs/)
Let's have a look at the folder structure.
| Directory | | Description | | --------- | | ----------- | | assets/ | | Contains images and other files uploaded via the SilverStripe CMS. You can also place your own content inside it, and link to it from within the content area of the CMS. | | cms/ | | Contains all the files that form the CMS area of your site. It’s structure is similiar to the mysite/ directory, so if you find something interesting, it should be easy enough to look inside and see how it was built. | | framework/ | | The framework that builds both your own site and as the CMS that powers it. You’ll be utilizing files in this directory often, both directly and indirectly. | | mysite/ | | Contains all your sites code (mainly PHP) | | themes/ | | Combines all images, stylesheets, javascript and templates powering your website into a reusable "theme" |
When designing your site you should only need to modify the mysite, themes and assets folders. The rest of the folders contain files and data that are not specific to any site.
Using the CMS
User Interface Basics
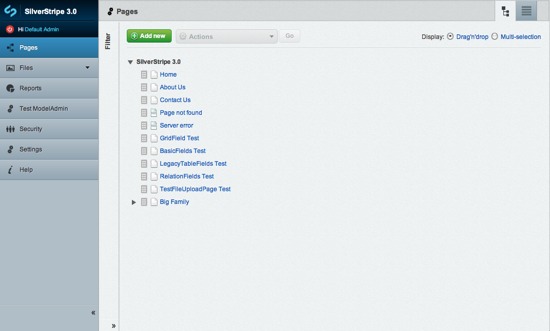
The CMS is the area in which you can manage your site content. You can access the cms at http://localhost/your_site_name/admin (or http://yourdomain.com/admin if you are using you own domain name). You will be presented with a login screen. Login using the details you provided at installation. After logging in you should see the CMS interface with a list of the pages currently on your website (the site tree). Here you can add, delete and reorganize pages. If you need to delete, publish, or unpublish a page, first check "multi-selection" at the top. You will then be able to perform actions on any checked files using the "Actions" dropdown. Clicking on a page will open it in the page editing interface pictured below (we've entered some test content).
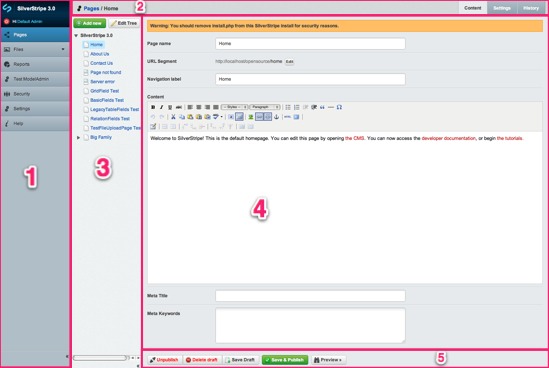
- This menu allows you to move between different sections of the CMS. There are four core sections - "Pages", "Files", "Users" and "Settings". If you have modules installed, they may have their own sections here. In this tutorial we will be focusing on the "Pages" section.
- The breadcrumbs on the left will show you a direct path to the page you are currently looking at. You can use this path to navigate up through a page's heirarchy. On the left there are tabs you may use to flick between different aspects of a page. By default, you should be shown three tabs: "Content", "Settings", and "History".
- Content - Allows you to set the title, wysiwyg content, URL and Meta data for your page.
- Settings - Here you set the type of page behavior, parent page, show in search, show in menu, and who can view or edit the page.
- History - This allows you to view previous version of your page, compare change and revert to previous version if need be.
- Within the "Pages" section (provided you are in the "Content", or "Settings" tab) you can quickly move between pages in the CMS using the site tree. To collapse and expand this sidebar, click the arrow at the bottom. If you are in the history tab, you will notice the site tree has been replaced by a list of the alterations to the current page.

- This section allows you to edit the content for the currently selected page, as well as changing other properties of the page such as the page name and URL. The content editor has full WYSIWYG abilities, allow you to change formatting and insert links, images and tables.
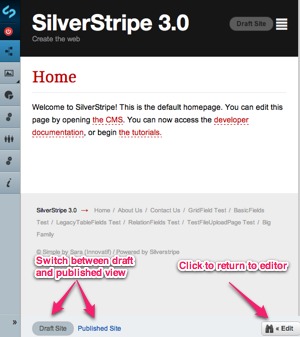
- These buttons allow you to save your changes to the draft copy, publish your draft copy, unpublish from the live website or remove a page from the draft website. The SilverStripe CMS workflow stores two copies of a page, a draft and a published one. By having separate draft & published copies, we can preview draft changes in the site before publishing them to the live website. You can quickly preview your draft pages without leaving the CMS by clicking the "Preview" button.
Try it
There are three pages already created for you - "Home", "About Us" and "Contact Us", as well as a 404 page. Experiment with the editor - try different formatting, tables and images. When you are done, click "Save Draft" or "Save & Publish" to post the content to the live site.
New pages
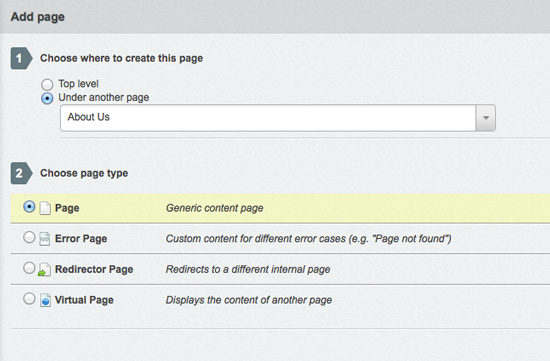
To create a new page, click the add new button above the site tree.
When you create a new page, you are given the option of setting the structure of the page (Top level or Under another page) and the page type.
The page type specifies the templates used to render the page, the fields that are able to be edited in the CMS, and page specific behavior. We will explain page types in more depth as we progress; for now, make all pages of the type "Page".
SilverStripe's friendly URLs
While you are on the draft or live SilverStripe site, you may notice the URLs point to files that don't exist, e.g. http://localhost/contact or http://yourdomainname.com/about-us etc. SilverStripe uses the URL field on the Meta-Data tab of the Edit Page -> Content section to look up the appropriate page in the database.
Note that if you have sub-pages, changing the Top level URL field for a page will affect the URL for all sub-pages. For example, if we changed the URL field "/about-us/" to "/about-silverstripe/" then the sub-pages URLs would now be "/about-silverstripe/URL-of-subpage/" rather than "/about-us/URL-of-subpage/".

When you create a new page, SilverStripe automatically creates an appropriate URL for it. For example, About Us will become about-us. You are able to change it yourself so that you can make long titles more usable or descriptive. For example, Employment Opportunities could be shortened to jobs. The ability to generate easy to type, descriptive URLs for SilverStripe pages improves accessibility for humans and search engines.
You should ensure the URL for the home page is home. By default, SilverStripe loads the page with the URL home.
Templates
All pages on a SilverStripe site are rendered using a template. A template is an HTML file augmented with special control codes. Because of this, you can have as much control of your site’s HTML code as you like.
Every page in your site has a page type. We will briefly talk about page types later, and go into much more detail
in tutorial two; right now all our pages will be of the page type Page. When rendering a page, SilverStripe will look
for a template file in the simple/templates folder, with the name <PageType>.ss - in our case Page.ss.
Open themes/simple/templates/Page.ss. It uses standard HTML apart from these exceptions:
<% base_tag %> is replaced with the HTML base element. This
ensures the browser knows where to locate your site's images and css files.
$MetaTitle, $Title, and $SiteConfig.Title in the html